Your foolproof guide to blush

Because this makeup basic is trickier than it looks to get right
The humble blush really is an underrated hero in our makeup kits. It’s the secret to making skin look ‘real’ and healthy with its natural flush of colour. But it’s also a step that can go horribly wrong - apply it in the wrong place or fail to pick the right shade for your skin tone and you can really make a mess of your makeup.
Good thing we spoke to the pros to find out everything you need to know about blush, including how to apply blush step by step for the perfect blush application.
#1 / How to pick a blush colour
“Blush is about creating your inner glow,” explains Ross Andrewartha, YSL Beauty Director of Artistry Australia. If you’re after a natural look, you want a shade that closely matches the hue you go when you’re actually blushing.
“For deeper complexions, a plum tone is beautiful,” says Andrewartha. “If you have a blue undertone, go for soft plum tones; if you have pink undertones, go for peaches,” he adds. “If you have a warm/golden olive undertone, use a bronze peach blush and avoid pink.” For fair skin, cool-toned pinks tend to look best.
Or, you can just follow Andrewartha’s top tip: “If you struggle to find your perfect shade, I would choose a universal colour that goes with nearly every complexion, which is a peachy-pink (neutral). This is a great go-to in my kit,” says Andrewartha.
Three failsafe blush shades to try: NARS Blush in Orgasm; Yves Saint Laurent Beauté Couture Blush in Coraile Rive Gauche; Benefit Cosmetics CORALista

NARS Blush in Orgasm

ves Saint Laurent Beauté Couture Blush in Coraile Rive Gauche

Benefit Cosmetics CORALista
“I’m also a fan of matching your lips with you cheeks; don’t be afraid to pressed a bit of lippy from you finger to your cheeks,” says Andrewartha.
Need more guidance? Here are some of our top picks for the best blush for your skin tone.
#2 / How to choose a blush formula
Andrewartha says your skin type can play a part in the type of blush you should be using.
For oily skin: “Powders create more of a classic look and can be great if you find your skin creates shine throughout the day.”
For dry skin: “I’m really into cream blushes, they mimic your skin and create that healthy glow, which is great for someone with normal to dry skin.”
Good to know: A cream blush stick is a great choice for beginners because it can be easier than a powder blush to apply precisely, it’s a dream to blend, and it has a dewy finish that is super flattering.
#3 / Where to apply blush
The simple answer you’ve probably heard over and over is above your cheekbones, but where to apply blush really depends on the look you’re after.
The look: Naturally rosy cheeks
This look is where blush really comes into its element, adding a subtle flush of colour that warms your complexion. You want it to look as real as possible - like you’re not even wearing makeup.
“When you smile, the apple of the cheek (the front plump area) is activated and that’s where you want a rosy glow,” says Michael Brown, Regional Artistry Ambassador for Marc Jacobs Beauty. “I like to use my fingertips to gently dab colour into the area, blending out the edges so it’s a hint of rosy fresh glow,” he adds.
The product you’ll need: “For this effect, I love using a cream blush or even sometimes a fresh-toned lipstick can work well, and saves carrying another product,” says Brown. Try Revlon Insta-Blush in Berry Kiss.
The look: Full flushed cheeks
Going that one stpe further than a natural flush, this look is all about making your blush obvious (but not doll-like). A bolder blush can look ultra feminine and alluring.
“With a tapered-tip, medium fluffy brush, apply blush in light circular motions on the apple of the cheek, and slightly higher to really lift, plump and engage the cheek area for a slightly fuller face effect,” explains Brown. “You don’t need to take this shade of blush too much through to under the cheekbone; keep it central.”
The product you’ll need: “For this look, I would be more inclined to use a powder - a peach tone is great for all skin tones, as it can be an uplifting fresh tone for dull skin, as well as balancing and warm for a naturally pink/red skin tone,” advises Brown. Try Clinique Cheek Pop in Melon Pop.
The look: Sculpted cheeks
Want to fake the look of higher cheekbones? Well, this is the blush application method you should follow:
First up, grab yourself a bronzer and blush (or a duo palette with two complementary shades).
“You need an angled brush for this application,” notes Brown. “The shorter side initially applies the product under the cheekbone from the hairline, and the longer brush bristles blend the product that has just been applied. It’s the perfect brush to create a smooth and blended contour effect for a sculpted cheekbone. Avoid coloured blush on the apple of cheek as this usually isn’t best for a full sculpted cheek effect.”
The product you’ll need: “For this look, you would use a bronzer or a blush with not much colour,” says Brown, such as a neutral/taupe or bronze shade. “Matte always looks better when used for sculpting, but a hint of radiance is ok, too - just not full metallic!” Try Marc Jacobs Beauty Air Blush in Flesh & Fantasy.

Revlon Insta-Blush in Berry Kiss

Clinique Cheek Pop in Melon Pop

Marc Jacobs Beauty Air Blush in Flesh & Fantasy
#4 / How to put on blush
There are a couple of things you need to keep in mind when determining how to apply blush on cheeks. The look you’re after (see #3) and your face shape.
How to apply blush according to your face shape
A square or round face: “For round or square faces, they generally want to slim the face - so adding the sculpted cheek look is more common for this face shape,” notes Brown. Keep your blush application slightly above the cheekbones and sweep it up to the temples. Steer clear of the apples of your cheeks to avoid a cherub-y vibe.
A rectangle, heart-shaped or oval face: “For anyone with a long or slimmer face shape, or even heart shape, they aren’t looking for contour/sculpted cheeks so blush is a great way to widen or plump out the apple of the cheek area,” explains Brown. Focus your blush application on the apples to accentuate their fullness then blend out to the hairline.
For more advice on correctly applying your blush according to your face shape, follow these tips from Gwyneth Paltrow’s makeup artist.
What is the best brush for applying blush?
“There are two brushes I pick up when playing with blush,” says Andrewartha. “One is a small compact but fluffy brush so I can work from the ball of the cheek to the temple. The reason I like a fluffy brush that is not dense is because it picks up the pigment and will gently diffuse onto the skin.” We like Nude by Nature Ultimate Perfecting Brush.
“The other brush is a contoured blusher brush. This is great if I want to create shape and structure to the face,” says Andrewartha. Try something like Models Prefer Galaxy Angled Blush Brush.

Nude by Nature Ultimate Perfecting Brush

Models Prefer Galaxy Angled Blush Brush
Looking to add a new blush to your makeup kit? This is the most pinned blush on the Internet.
Do you wear blush? What’s your go-to product and preferred blush look? We’d love to hear from you in the comments section below.
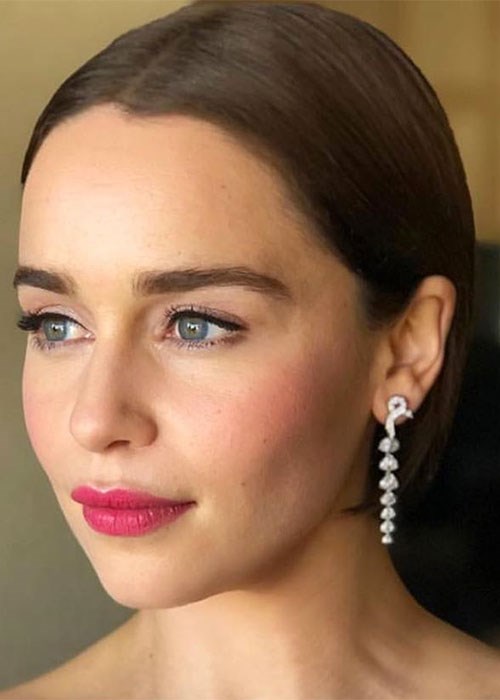
Main image credit: @emiliaclarke

Chelsea is BEAUTYcrew’s Contributing Editor. She has a sweet spot for anything that claims to make skin glow and won’t leave the house without a slick of mascara. Chelsea has 10 years of experience as a beauty editor and her words can be found on BEAUTYcrew, Women’s Health, Daily Addict, The Joye and Primped.


